Wednesday, March 12, 2014

Welcome Back!!


Wow --- I am disgusted that I have neglected this for sooooo long now!!  I am excited to JUMP BACK IN and help us all prepare better for any emergency that will arise.  I encourage us all to evaluate our needs, desires, family & neighborhood plans!  See where we can improve and help others.

If you have any questions...don't hesitate to contact me.  kateandlavon(at)gmail(dot)com.

Friday, April 27, 2012

FREE Powerless Cooking Class in Draper on May 10th!

From http://foodstoragemadeeasy.net/2012/04/23/free-powerless-cooking-event/

We are excited to be hosting an evening of free information on different options for cooking when the power goes out. Representatives from great companies such as Sun Oven, Volcano Grills, Humless, and InstaFire will be combining with Jodi and Julie from Food Storage Made Easy to help you learn about these products as well as several free or inexpensive tools you can make yourself. Come and enjoy free handouts, event discounts, giveaways and more!
Cost: FREE! Bring a friend!
Date: Thursday May 10, 2012
Time: 7-9 pm (7-8 will be instructional, 8-9 will be Q&A at individual booths)
Location:
American Preparatory Academy
12892 S. Pony Express Rd. (Just off of I15 and 123000 S.)
Draper, Utah 84020
Learn More and RSVP TODAY!

Friday, April 20, 2012

Great Utah Shakeout -- in review

An evaluation survey has been created to see "how you did" or perhaps get a better idea on what you can focus on and do better.  The link below will take you to the page where you can proceed!!  Hope you all took a minute last Tuesday to do ONE THING to further your emergency preparedness!

http://www.shakeout.org/utah/evaluation/2012/

Monday, April 16, 2012

The Great Utah ShakeOut!! 4/17/12

Remember this Tuesday is the Great Utah ShakeOut! For state details go here... www.shakeout.org/utah. Our ward will be doing a "radio check-in" @ 10:30 am. So, if you are home or "in range" hop on FRS CHANNEL 13 @ 10:30 am!

Thursday, April 12, 2012

Water Storage -- in full depth!

Wow -- this is a great summary for a MAJOR necessity! Check it out to answer all your water storage questions!!

http://foodstoragemadeeasy.net/2012/04/05/water-storage-series-faq/

Monday, March 12, 2012

The Great Utah Emergency Preparedness Expo

April 6th and 7th
@ Utah Valley University
1 Adult = $12 for both days (pay $15 at the door)
Whole Family = $35 (children 12 and under are free)

Full details can be found here: http://www.freefood2go.com/expo.php

Wednesday, December 28, 2011

Is "Food Storage" part of your New Year Resolutions???

Does your food storage look like this?! Possibly.


If not...here are some helpful tools: (all of which I have no association with but just did some "googling" on our behalf!)


http://foodstoragemadeeasy.net/ : you can sign up to receive bi-weekly emails that provide step-by-step checklists.


http://pgward.org/ep/ : this is a site from a Pleasant Grove Stake that has TONS of useful information!! They have a 52 week Food Storage Plan available with recipes and even a calculator (Excel document) that can tell you how much of what you need for your family.


http://www.mormonshare.com/lds-activity/food-storage-in-a-year-plans : here you can find several different approaches to obtaining food storage in one year


http://52weekstopreparedness.blogspot.com/ : this blog includes "extras" to buy each week as well as some spiritual preparation (FHE ideas).


Do you have other Emergency Preparedness goals for 2012? Let me know and I would be happy to help!!

Sunday, December 4, 2011

Northern Utah Wind Storm -- insight

image source: http://www.ksl.com/index.php?sid=18327614&nid=460&page=3#4


Just in our own "backyard" many learned a little more about preparedness this last week. The wind gusts tore through the Centerville area leaving many without power for hours. I am sure there are many other documentations...but I found this one thought provoking and wanted to share.

Click here to read her story and see the devastation she saw.


We just never know what may happen....tommorrow.

Monday, November 14, 2011

Water - Storage, Purification and Filtration

Water makes up more than 2/3 of our body. We lose water by perspiration, breathing and urination. Within 3 days of dehydration our body's organs will suffer severe damage and lose functionality. With water being ESSENTIAL, we must know how to treat and store our water safely and effectively.

WATER STORAGE -- this portion has been taken from FEMA
How Should I Store Water?
To prepare safest and most reliable emergency supply of water, it is recommended you purchase commercially bottled water. Keep bottled water in its original container and do not open it until you need to use it. Observe the expiration or "use by" date.

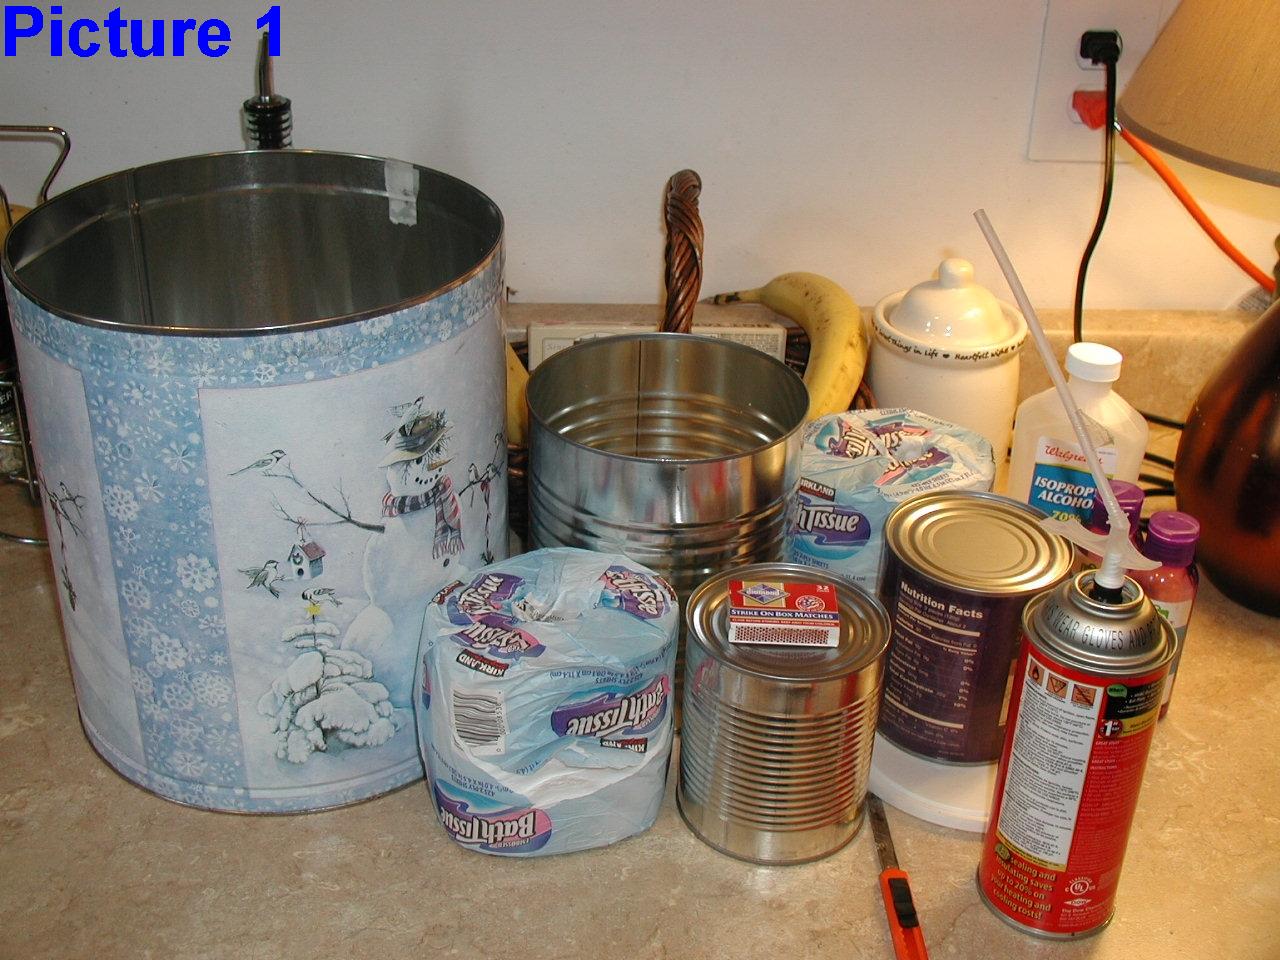
If You are Preparing Your Own Containers of Water
It is recommended you purchase food-grade water storage containers from surplus or camping supplies stores to use for water storage. Before filling with water, thoroughly clean the containers with dishwashing soap and water, and rinse completely so there is no residual soap.

Follow directions below on filling the container with water.
If you choose to use your own storage containers, choose two-liter plastic soft drink bottles – not plastic jugs or cardboard containers that have had milk or fruit juice in them. Milk protein and fruit sugars cannot be adequately removed from these containers and provide an environment for bacterial growth when water is stored in them. Cardboard containers also leak easily and are not designed for long-term storage of liquids. Also, do not use glass containers, because they can break and are heavy.

If storing water in plastic soda bottles, follow these steps: Thoroughly clean the bottles with dishwashing soap and water, and rinse completely so there is no residual soap. Sanitize the bottles by adding a solution of 1 teaspoon of non-scented liquid household chlorine bleach to a quart (1/4 gallon) of water. Swish the sanitizing solution in the bottle so that it touches all surfaces. After sanitizing the bottle, thoroughly rinse out the sanitizing solution with clean water.
Filling Water Containers
Fill the bottle to the top with regular tap water. If the tap water has been commercially treated from a water utility with chlorine, you do not need to add anything else to the water to keep it clean. If the water you are using comes from a well or water source that is not treated with chlorine, add two drops of non-scented liquid household chlorine bleach to each gallon of water. Tightly close the container using the original cap. Be careful not to contaminate the cap by touching the inside of it with your finger. Place a date on the outside of the container so that you know when you filled it. Store in a cool, dark place. Replace the water every six months if not using commercially bottled water.

For more information on water storage go here.

WATER PURIFICATION -

There are many ways to purify water...and none are perfect. Sometimes it is best to use several different methods.

BOILING: the most common method...boil water for 3-5 minutes. Cool to drink. It will taste better if you add oxygen by pouring water back and forth from 2 clean containers.

Pros: easy, quick
Cons: takes a lot of fuel, some water evaporates, does not rid of foul odors or smells and does not filter water of particulates

CHLORINATION: also taken from FEMA
You can use household liquid bleach to kill microorganisms. Use only regular household liquid bleach that contains 5.25 to 6.0 percent sodium hypochlorite. Do not use scented bleaches, color safe bleaches, or bleaches with added cleaners. Because the potency of bleach diminishes with time, use bleach from a newly opened or unopened bottle.

Add 8 drops (clear water) and 16 drops (1/8 teaspoon - cloudy water) of bleach per gallon of water, stir, and let stand for 30 minutes. The water should have a slight bleach odor. If it doesn’t, then repeat the dosage and let stand another 15 minutes. If it still does not smell of chlorine, discard it and find another source of water.

Other chemicals, such as iodine or water treatment products sold in camping or surplus stores that do not contain 5.25 to 6.0 percent sodium hypochlorite as the only active ingredient, are not recommended and should not be used.

Pros: simple and fairly quick
Cons: must have "potent" enough bleach (not more than 6 months old), too much bleach can be poisonous and even deadly

FILTRATION: information taken from here.
Water filtration simply means to strain out the impurities from a water source. The larger the impurity particulate the easier it is to filter. The opposite is true also, the smaller the impurity particulate, the harder it is to remove. Thus, the size of the filter pore and the durability of the filtering element are important to the filter’s longevity and ability to perform. Most filtering elements are made of ceramic, glass fiber, hard-block carbon, or materials that resemble compressed surgical paper.

Ceramic elements (most expensive, most durable, and maintainable) have the smallest pore size (0.1-0.5 microns) and are used by some of the leading portable water filtering companies in the world. Portable ceramic filters boast an impressive list of long-term users, such as: International Red Cross, World Health Organization, Armed Forces (USA, Germany, Portugal, Switzerland, and US Navy Seals), United Nations, and the FBI. Ceramic elements can filter only free floating particulates and microorganisms. They do not remove chemicals, poor tastes, odors, or pollutants.

Glass fiber elements and compressed surgical paper (mildly expensive, medium durability, and usually not cleanable) also have small pores (0.2-1.0 microns). Like the ceramic filter, they remove only particulates and microorganisms, but they do not help much with pollutants. These are good low-cost filtering elements for home, backpacking and scouting needs, but they are not good for long-term storage because they can develop mold and mildew and they are hard to clean.

Hard-block carbon elements (less expensive, brittle, and not cleanable) have a small, but still effective pore size (0.4-2.0 microns). They are also used as an absorption filter. The best contribution that carbon makes to filtering is its ability to reduce chemical quantities, poor taste, odors and many pollutants. Because carbon is only mildly effective in filtering out particulates and microorganisms, it is mostly used as a second or third stage filter in home and portable water use. It is seldom used as a stand-alone filtering unit.

Filtration summary: taken from here.
There are two types of water filters, inexpensive travel water bottle filters and gravity carbon filters. A travel water bottle filter is great to throw into your disaster kit, but in cases of extreme contamination you would still want to add in a few drops of iodine or bleach. If you opt for a gravity carbon filter such as the AquaRain or Berkey ones, it MAY be enough purification, but we still recommend to use one of the other methods as well. It can never hurt to be too safe. If you are conserving fuel or on the run, a filter can definitely be a great option and is MUCH better than no purification at all.

Monday, October 31, 2011

Post Topics

This is a test....to see who is reading this blog -- Just kidding!! But really, in order for this to be the MOST useful to all I want it to contain information you are interested in or have questions about. I can continue to pull topics 'out of the air' OR (this is where you come in) you can submit topics. I'll do your research and let you know what I find! What a deal!

So -- either leave a comment below, email me or hunt me down at church. Whichever. :-)

I'll be your personal emergency ask.com-er.

My name is Kate, how can I help you?

Sunday, October 16, 2011

Fire Extinguisher 101

Source: http://www.fire-extinguisher101.com/ (bold and emphasis added)


With so many fire extinguishers to choose from, selecting the proper one for your home can be a daunting task. Everyone should have at least one fire extinguisher at home, but it's just as important to ensure you have the proper type of fire extinguisher. Fire protection experts recommend one for the kitchen, the garage and workshop.

Fire extinguishers are divided into four categories, based on different types of fires. Each fire extinguisher also has a numerical rating that serves as a guide for the amount of fire the extinguisher can handle. The higher the number, the more fire-fighting power. The following is a quick guide to help choose the right type of extinguisher.

Class A extinguishers are for ordinary combustible materials such as paper, wood, cardboard, and most plastics. The numerical rating on these types of extinguishers indicates the amount of water it holds and the amount of fire it can extinguish. Geometric symbol (green triangle)
Class B fires involve flammable or combustible liquids such as gasoline, kerosene, grease and oil. The numerical rating for class B extinguishers indicates the approximate number of square feet of fire it can extinguish. Geometric symbol (red square)
Class C fires involve electrical equipment, such as appliances, wiring, circuit breakers and outlets. Never use water to extinguish class C fires - the risk of electrical shock is far too great! Class C extinguishers do not have a numerical rating. The C classification means the extinguishing agent is non-conductive. Geometric symbol (blue circle)
Class D fire extinguishers are commonly found in a chemical laboratory. They are for fires that involve combustible metals, such as magnesium, titanium, potassium and sodium. These types of extinguishers also have no numerical rating, nor are they given a multi-purpose rating - they are designed for class D fires only. Geometric symbol (Yellow Decagon)
Class K fire extinguishers are for fires that involve cooking oils, trans-fats, or fats in cooking appliances and are typically found in restaurant and cafeteria kitchens. Geometric symbol (black hexagon)


(Additional information - not from above source):


Where should you keep your extinguisher(s)?? In your kitchen? In your utility room? Seems like a great place for them...however, those are the places where your fire will most likely be. Instead, keep them NEAR the place your fire is most likely to occur (ie...in coat closet or near utility room). You don't want to go IN the fire to get your extinguisher.

Tuesday, October 11, 2011

Storing Your Emergency Supplies

I had heard this before and planned to do it..but when I found this other blog post...I knew I REALLY WANTED (aka NEEDED) to do it. Where do you store your Emergency items? Will you be able to access them if you need to??


Picture and Below Information is taken from: http://preparedldsfamily.blogspot.com/2008/09/coat-closet-becomes-emergency-supply.html
If a disaster strikes, I may not be home and I want my kids to have easy access to food and water, and emergency supplies. I moved coats out of the coat closet, and emergency supplies in. Before, I had these items in our Utah basement. But what if an earthquake or flood occurs? Did I really want kids (or me) running downstairs, and then trying to get out? After talking to several people who have actually lived through evacuations, easy access to emergency supplies makes more sense. Believe me. You don't want to run through your house looking for everything. The time to prepare for the disaster is before it strikes.

AN EMERGENCY PLAN (practice every 6 months, General Conference) - Every family needs to create an emergency plan with the thought that Mom or Dad may not be home when disaster strikes. Such as: In a smaller emergency, the kids will go to a neighbor's house for help. If my teen son has to drive to evacuate, they will go to their aunt's house in a neighboring town. If they have to go on foot, they will probably follow neighbors to the local school or church. Each teen needs phone numbers to a relative living in state, and one out of state. If cell phone lines are jammed, at least they have a contact number they can call, and you can also call. Eventually you will get connected. Post this plan on the wall, since people forget.

PORTABLE RADIO - It's important to have an AM radio with spare batteries to listen to local radio reports when disaster threatens. Your power may be out. I wrote the local emergency radio station channel on the radio with permanent marker. Then, I put it in a baggie with the batteries, and hung it on the edge of the closet shelf.

FIRE EXTINGUISHER - You can mount on a wall or stand on a shelf in the same area.


BEDDING - Consider storing your blankets or sleeping bags near emergency packs. I placed some of our blankets on the top shelf.

PORTABLE SAFE - The other day, a friend told me that a relative had to leave her home after an earthquake in China. She ran outside, and couldn't go back in. She had no ID! So, a small safe or a portable file box such as the one from MyLifeInaBox.com which can hold important documents and CD's with family photo's is a good idea to grab and go.
Include: emergency cash ($10's, $5's, $1's), home mortgage, insurance policies, home inventory, marriage certificate, birth certificates, immunization records, family medical history, driver’s license copy, passports, social security #'s of kids, automobile ownership, wills & other legal documents, bank account #'s, credit card companies & account #'s, etc.

EMERGENCY BACKPACKS - Each family member should have an emergency backpack. Lest expensive time to buy a backpack is the end of September during the school clearances. Items in the emergency packs should be updated yearly, as clothing sizes and needs change, and food can be rotated. I looked in my 3 year-old's backpack the other day, and found diapers, a baby blanket, etc. Items she doesn't even use anymore! Time to update. An easy way to remember when to update is every October General Conference or perhaps around somone's birthday.
Items should be stored in Ziploc baggies to protect them from moisture.

emergency rain poncho, thermal reflective blanket
jr. legal pad of paper, 5 x 8 and pen, small games for kids
medical & dust mask, comb, toothpaste, travel toothbrush, 4 antibacterial hand wipes, pocket tissues, lip balm
travel sized: liquid body soap, shampoo/conditioner, deodorant, lotion
toilet paper roll in Ziploc
Clothing includes shoes, socks, undergarments, sweat pants, long-sleeved-shirt, and sweat jacket. If an emergency happens in the summer, you can cut pants into shorts and cut off the long-sleeves. Buy at WalMart, K-Mart, or a used clothing store in a larger size than kids actually wear. Since this is a coat closet, we store our running shoes here all the time.
Food Packs - (store what your family will eat)
6 - 16.9 oz. bottles of water, 12 oz. enamel camp cup, 3 plastic spoons, 3 antibacterial hand wipes, 3 instant oatmeal packets, 3 packets hot cocoa, 2 Lowry's beef jerky, 2 granola bar, 2 Trail Mix bars, 2 Handi Snacks crackers 'n cheez, 2 fruit snacks, 1 package gum, 10 pieces of hard candy, 3 Del Monte fruit cups 4 oz., 3 Chef Boyarde Ravioli or Lasagna 7.5 oz. mini

FAMILY EMERGENCY BUCKET - A 5 gal bucket w/lid (can be used as seat, or toilet), First Aid Kit, Flashlight with 4 D batteries in a Ziploc, Portable Radio with 6 AA batteries in a Ziploc, 40 Coleman Waterproof matches, 50 Potable Aqua Water purification tablets, Can opener, Winchester 12-Function Army Knife, Rope, coil of 50 ft., Duct tape, Work gloves, 3 - large trash bags & 3 - 13 gal. plastic garbage bags (line the bucket for a toilet), wick chafing fuel, Map of city and vicinity, Disaster tips handouts, American Red Cross brochures

EMERGENCY PET BACKPACK (update every 6 months) - Each pet needs an emergency pack: Water, pet food, leash, collars with identification tags, medications, vaccine information, plastic bags for poop, name and number of veterinarian, toys

IDEAS FOR INFANT EMERGENCY PACK (update every 3 months) - water, food, juices, formula, bottles, pacifier, diapers, wipes, baby soap and baby powder, change of clothing including gloves, jacket, shoes, blankets, towel, medications, toys

Friday, September 30, 2011

Rotating 72 Hour Kits

Conference weekend is here and that is a great time to rotate some supplies in your 72 hour kit. Food that is expired should be replaced. Batteries can be rotated. Check the clothes in your children's kit to see if they need to be replaced with bigger ones.

Conference weekend provides the perfect opportunity twice a year to update your kit.

For those of you who haven't made your kits yet...conference weekend is a great time to get started!!

Wednesday, September 21, 2011

Emergency Heat Sources

This cooler weather has been wonderful!! Except for the lil' PUNCH we get after as the snow hits. Which has me thinking...and worrying..."what if a disaster happens in the dead of winter?!" Here are some tips that may help us be better prepared. Information for this post has been taken from here.
Keeping warm is essential for survival. Loss of body heat, Hypothermia, is very dangerous and can lead to loss of body parts and even death. Wet conditions quickly increase the loss of body heat. When traditional heat sources are not available, below are a few ideas to help you keep warm:

DRY (PREFERABLY WOOL) CLOTHING:
If you get wet from rain, snow or sweat, change into clothing that is dry. Wet clothing loses its insulation value and extracts body heat 240 times faster than dry clothing. Wool clothing and blankets are preferred. Cotton clothing, particularly denim, retains water. Woll clothing is insulating, water resistant, and keeps your body warm even if it is wet.

HATS AND MITTENS (PREFERABLY GLOVES):
Covering your head is vital as you can lose up to 80% of your body heat through your head. A knitted wool stocking hat is good.

INSULATED BOOTS AND SHOES:
Feet can be kept warm by wearing wool socks and wearing two pair if your shoes are large enough. A towel could also be wrapped over shoes and duct-taped on.

LAYERED CLOTHING:
Several thin layers of loose-fitting clothing retain body heat and can be removed easily if body starts to perspire and/or you are chilling. Water & wind resistant outer clothing with a hood. Also, scarf or towel to cover your mouth to keep cold air from your lungs.

SLEEPING BAGS:
Two or more people huddled together inside two sleeping bags zipped together will be warmer than each in separate sleeping bags. A smaller bag can also be placed inside a larger-sized one.

CAR HEATER:
If trapped in your car during a snowstorm, run heater 10 minutes every hour. Make sure the exhaust pipe is not blocked by snow and open one window a crack to allow ventilation.

MYLAR BLANKETS OR EMERGENCY BAGS:
Good in wind or rain. Put a wool blanket between you and the Mylar blanket, if possible.

SURVIVAL CANDLES, SAFETY HEAT (IN A CAN), HAND WARMERS

RICE OR BEAN-FILLED PACKS:

You can also use socks filled with rice/beans and tied shut. Heat the packs/socks in a fire or coals. They will maintain heat for a period of time. Rocks or bricks can also be heated thoroughly, then carefully wrapped in towels or newspapers.


THERMAL UNDERGARMENTS

INSULATED CLOTHING:
Leaves, newspaper, straw, etc. (stuffed between two layers of clothing). Tie your shoe laces around the cuffs of your pants to hold material in. If you were trapped in a car during a snowstorm, use the stuffing from the seat cushions.

PLASTIC GARBAGE BAG:
This can be worn as a rain jacket or can insulate the body if stuffed with dry leaves or grass


Another alternative heating method is to make your own "#10 Can Heater" with items shown below. A detailed tutorial can be found here.

Monday, September 19, 2011

Establishing a Financial Reserve


The following has been taken from this site: http://preparedldsfamily.blogspot.com/2011/03/emergency-cash-for-real-emergencies.html

"Establish a financial reserve by saving a little money each week and gradually increasing it to a reasonable amount." -- ProvidentLiving.org

"We encourage you wherever you may live in the world to prepare for adversity by looking to the condition of your finances. We urge you to be modest in your expenditures; discipline yourselves in your purchases to avoid debt. . . . If you have paid your debts and have a financial reserve, even though it be small, you and your family will feel more secure and enjoy greater peace in your hearts." —The First Presidency, All Is Safely Gathered In: Family Finances, Feb. 2007, 1

President Gordon B. Hinckley has taught: “Set your houses in order. If you have paid your debts, if you have a reserve, even though it be small, then should storms howl about your head, you will have shelter for your wives and children and peace in your hearts” ("To the Boys and to the Men," Ensign, Nov. 1998, 54).

Putting aside emergency cash is "an investment against the unexpected – situations where everything else has failed and I have no other options to turn to." TheSimple Dollar.com

THINK ABOUT IT -
Emergency Scenario #1: You just went through a major disaster. You can't leave the city and need some supplies. The power is out and the grocery store isn't accepting ATM or credit cards.

Emergency Scenario #2: You've suddenly been asked to evacuate because of a fire on the mountain near your home. You hope you can eventually drive to your sister's out of town, but suddenly the roads are congested. Everything is at a standstill and you could only make it across town. You need gas, food and water, and possibly a hotel room.

Emergency Scenario #3: Your youngest child is very ill. You need some medication from the pharmacist, but you left your wallet at work which is about 30 miles away.

Emergency Cash Tips:
Put it in several locations
Keep it safe from water and heat damage
Nothing larger than a $10 bill (You could pay $5 for a bottle of water in an emergency.)
Keep about $20 to $100 hidden in your car
Keep about $20 to $50 in your wallet in small bills
Keep minimum $100 per person at home
Dave Ramsey, author of "The Total Money Makeover," recommends you start with $1000.
Consider how you might use it in 72 hours - food, hotel, gas, etc.
Convert collected coins to smaller bills. It needs to be accessible, but don't use it to buy your lunch.
Hide it in unobvious locations, but make sure your trusted older kids know where it is. You may not be home when they need it.

Wednesday, September 7, 2011

72 Hour Kits

Wanna have a 72 hour kit, but don't want to put the work into it?? Emergency Essentials has a great pre-made kit that has the basics you will need in an emergency. Here is the link:

http://beprepared.com/product.asp_Q_pn_E_k7%20B350

This is a great starter kit that is packed and ready to go!

"Preparation of All Kinds Blesses Saints in Joplin, Missouri "


(taken from Ensign magazine, September 2011 issue. Emphasis added. For this article and others in this issue click here.)

By Melissa Merrill
Church News and Events

--------------------------------------------------------------------------------
Candles. Granola bars. A lantern. These emergency supplies from the storage of several Latter-day Saint families played a role in facilitating the Joplin Missouri Stake’s organization and action in the initial hours after a tornado devastated Joplin on May 22.

The stake center had been destroyed, as had other major buildings in the area, and electricity was out in many other parts of the city. But a small group of area, stake, and ward leaders was able to meet together in council, by candlelight and lantern light, in the home of Joplin Second Ward bishop Dave Richins to determine what to do in recovery, relief, and rebuilding.

As that council and so many other members in the Joplin Missouri Stake discovered, physical and spiritual preparation both played crucial roles in those efforts.

Physical Preparation
Fortunately, the Joplin stake had an emergency plan in place, and members were prepared to account, assess, and report promptly in the wake of disaster.

Our emergency plan, while there is a lot of detail to it, is quite simple: account, assess, report promptly,” said stake president Creed Jones. “You need to account for your people. Everybody goes out to find out how the missionaries are, how the members are, and if everyone is accounted for. Then they assess. Who is missing? Who has injuries? Who is without a home? Who is without power? What are their physical situations, family needs, and so forth? And then you report promptly, communicating that information back through the priesthood line.”

The process worked well, President Jones reported, and he said that he received several accounts of people running or walking for miles (roads and other infrastructure were impassable at first because of debris) to check on family, friends, coworkers, and ward members.

“What you really learn is that the Church is not just what takes place in a chapel or classroom on Sunday,” President Jones said. “The real test comes when there are needs and we have to look out for each other.”

Because of the nature of the destruction, food storage and other emergency supplies weren’t always preserved. But those whose homes were spared were prepared to share what they had with others.

Spiritual Preparation
Mike and Becky Higginson have faithfully built their home storage over time, and while the tornado destroyed their home, their food storage shed survived the destruction.

The Higginsons are grateful for this blessing, but they are quick to point out that physical preparation alone is not enough to sustain someone through this kind of event. They know that obedience to the counsel of prophets and apostles builds another kind of storage.

“We’ve had hard experiences before, and the gospel is what sustains you through everything,” Sister Higginson said. “So although this was a shock and a trauma … it didn’t change anything. You revert to your gospel roots, your spiritual roots, immediately.”

The morning after the tornado, Bishop Chris Hoffman of the Joplin First Ward met with several other priesthood holders at a central spot in town to begin accounting and assessing. With communication lines down, “it was hard to determine where to start,” said Bishop Hoffman, but they relied on prayer for direction.

“You recognize very quickly—if you didn’t already—how reliant you are on Heavenly Father for answers, because you need them, and you need them quick,” he said. “But the answers came. They always did. They always will.”

That kind of faith and reliance on the Lord has continued to buoy up members in Joplin. On the Sunday following the tornado, Elder Jonathan C. Roberts, Area Seventy, attended a joint testimony meeting of the Joplin First and Second Wards.

“People who had lost everything—their homes, their workshops, everything—stood up and said, ‘We’re some of the most blessed people.’ How does that happen?” Elder Roberts asked. “How could anybody in those circumstances have the courage and the backbone to square their shoulders, lift their chins, and say, ‘We’re fine’? Well, it only happens one way. They have a perspective of the gospel of Jesus Christ.

“In this case, the 72-hour packs, as important as they were, the food storage, as important as it was, went away because of the calamity,” he continued. “And yet the things that were deep rooted, the foundational things of priesthood keys, of testimony, stood strong. And as the Saints gathered together, it was spectacular to watch the preparation that came from spiritual roots that had been set deep; that windstorm, tornado, or hurricane weren’t going to take away; and that extends beyond mortality and to eternity.”

Watch a video about the Saints in Joplin at news.lds.org. Click here for video.

Spiritual and temporal preparation has blessed the lives of Latter-day Saints and others in Joplin, Missouri, following a devastating tornado on May 22.